Tuesday, August 25, 2015

YouTube in Your Classroom

YouTube is a powerful tool.  It's difficult to argue with this statement.  We, at #CCSDTech, are here to support you in making YouTube a powerful tool in the classrooms of Cherry Creek Schools.  This post, more specifically, will focus on supporting teachers with using YouTube more effectively as a presentation tool.  Let's get right to it.

We've mentioned it before and we're going to mention it again.  One of our favorite, as well as easy to use, YouTube tools is Turn Off the Lights.

There is no doubt that the comments, suggested videos, and everything else that is posted around a YouTube video can be a huge distraction (or worse) when a teacher is showing a video to students via their computer through a projector.  Leaving everything up and easily visible while you show a video to a class full of kids can be a potential gamble.  Turn Off the Lights is a Chrome browser extension which hides everything but the window the YouTube video is playing in.  The chances to customize the view in Turn Off the Lights are numerous as well.  Easy installation and use as well as plenty of chances to personalize the view are two of the many reasons why we highly recommend and use Turn Off the Lights when we show YouTube videos.

Check out the difference below.

Traditional YouTube without Turn Off the Lights:


YouTube while using Turn Off the Lights, one simple click later:


Side note: We've already featured Turn Off the Lights in blog posts here and here.  Any tool worth mentioning over and over is worth exploring.  Check it out.


Adjusting the Start Time of a Linked YouTube Movie

Sometimes you'll want to begin a movie in the middle of a YouTube clip.  There's the option of actually dragging your cursor to a particular point in the video and letting it play from there.  Here's a more efficient option.  Pause the movie where you'd like it to begin, click on the share button below the movie window, click in the "Start at..." box, then copy the special link YouTube gives you.  Share/post the link to that movie with the special URL and it will begin right where you want it to when someone clicks on the link.  Magic.

For example, I want you to go straight to the chorus of this classic song when you click on this link.  Sing it, Teddy P.


Extracting the Middle of a YouTube Clip

If you require showing the middle of a YouTube clip (nothing more and nothing less) look no further than TubeChop.  TubeChop supports users with extracting the middle of any YouTube video.  Copy the YouTube URL of the video you'd like to share, paste it into TubeChop, decide when you want your start and end times to be, include your own description or "teaser" (if you wish), and get a unique link or embed code so you can share just what you want your audience to see.

I set up an example in TubeChop here.  Enjoy.


Exploring Code in YouTube

But wait, there's more.  We're actually just getting started with YouTube sharing and viewing options.  Google gives users some serious flexibility when it comes to embedding videos.  YouTube coding magic starts just underneath the video once you click on the "Share" option and then "Embed."


If you can copy and paste you're more than qualified to explore coding.  Check out this link for information for beginners all the way up advanced options. 

As you may have already guessed, there are plenty more YouTube features, tips, and tricks that we'll be sharing with you in the near future and throughout the year.  Student interaction while viewing videos, creating YouTube playlists, uploading best practices in YouTube, and more are on the way.  Stick with us.  We're here to help you be smarter with YouTube.  Stay tuned!  

Tuesday, August 18, 2015

Tuesday Tech Tip: Class Dojo


I’ve always struggled with classroom management.  In fact, I used to joke that I was really good at getting students excited about learning, and really bad at getting kids to settle back down.  Over the years, I’ve tried everything!  I’ve used table points, classroom money, an OOPS book, sticker charts, writing the word R-E-C-E-S-S on the board and then erasing one letter each time students were misbehaving.  I’ve added extra time for fun activities, and taken that time away.  I’ve created prizes that I thought students would like.  The results were always the same: by Thanksgiving, I would forget to hold students accountable, often giving students extra chances, and students would lose interest in the management system.  By the end of the year, students would have learned all my loopholes and I would periodically turn into Mr. Strict, in a desperate attempt to regain control of my classroom.  


In the twelve years I spent in the classroom, I learned two things: (1) students getting excited about learning is not a classroom management problem; and (2) I needed to find a simple, better way to reward students for their behavior, encouraging students to be critical thinkers and holding them accountable to my high standards, while dissuading rare, inappropriate behavior.  Today’s Tech Tip concerns the latter: ClassDojo.


I have used ClassDojo regularly for the past five years.  In fact, I was one of the original teachers piloting the management system, becoming a Class Dojo Mentor for my school building and the Cherry Creek School District.  It is easy to set up, hold students accountable for behavior, encourage positive behaviors, and communicate what you are doing in the classroom.

So, let’s get started!  I’m a big proponent of finding other resources to help me as a teacher. Luckily, there are a TON of tutorial videos or step-by-step guides in order to help you set up Class Dojo for your own classroom.

Student Introduction to ClassDojo

When introducing any new classroom management system, it is important to establish the WHY and the HOW.  Why am I using ClassDojo?  I always tell students that, as their teacher, I am helping them become the best students possible, both academically and behaviorally.  ClassDojo allows me to help students be successful through various actions.  For example, to be a successful fifth-grader, I want students to actively listen, collaborate with others, think creatively, take risks, persists through learning activities, and work hard.  When I notice students doing any behavior I expect, I can award Dojo Points or Mojo!  Students LOVE receiving Mojo!  All students want to please their teachers and be successful students, so awarding Mojo is a great way to encourage students to behave well.  ClassDojo does a great job of introducing their management system to students.


Parent Communication

Parent communication is by far my most favorite feature!  Using Class Dojo's messaging app, I can let parents know exactly how their child is behaving all throughout the day.  In fact, it even time-stamps when I give out positive Mojo, so parents can see what time of day I am recognizing positive behavior.  Below, is a video of parent testimonials put out by ClassDojo.  I really feel that the sentiments expressed in the video accurately represent how my own parents felt throughout the school year.  The best part: parents get to hear all about the GOOD stuff, not just the negative emails and phone calls.


Groups

Teachers can create now create groups in ClassDojo.  This is a feature I sorely wanted when I first found ClassDojo.  Now, I can give groups of students points, instead of selecting individual students in order to award them the same Mojo. During the school year, I always had my students in table groups.  I wanted to encourage collaboration to solve real-world problems.  For example, I wanted students to remember that they would be working in teams. As an adult, have you ever worked in a team that didn’t get much done because someone dominated, and someone else didn’t participate at all? That never happened in our classroom thanks to ClassDojo!  Students operated like groups of student engineers: in a smooth, cooperative way. ClassDojo encouraged every student to want their team to be the very best in the class.  As a class, we were able to set guidelines for team behavior. We based these guidelines on behaviors we all wanted to see in other team members. Example Mojo points included: SHARING OF IDEAS, TAKE TURNS TALKING, TAKING WORK SERIOUSLY, and BEING POSITIVE. I was able to improve classroom participation 100%!

How to use Custom Avatars

When I first introduced ClassDojo, students were extremely excited to create their own monster avatar.  ClassDojo offers a ton of great, furry monsters and critters for students to choose from.  In fact, students can even use their own picture as their avatar.  Here is a quick video tutorial from one of my favorite classroom technology Bloggers, Richard Byrne.

How to Add a Behavior

I highly suggest creating behaviors with your students that you want to encourage throughout the year.  I always did this at the beginning of the year, but like any project, we were constantly refining throughout the school year.  We often revisited our behaviors to discuss if they were still of value to the students.  Even though ClassDojo focuses on positive Mojo, there will undoubtedly be a few students who want to test the rules.  I think involving students in creating the NEEDS WORK Dojo points is just as important.  What behaviors are we struggling with this week? Are these based on a single incident or do we need to watch for them throughout the upcoming weeks?  As a teacher, my class focused on different behaviors often, but these were some common ones: NO HOMEWORK, OFF TASK, NOT LISTENING, and UNORGANIZED.  You can also weight both positive and negative Dojo points, having COLLABORATION worth 5 Mojo points and NO HOMEWORK worth -3 Dojo points.

ClassDojo's Newest Feature: Class Story!

ClassDojo is constantly listening to teachers and working to improve their classroom management tool.  When teachers asked for ways to communicate pictures with parents, ClassDojo launched their Messenger App, which allowed teachers to message parents with text and pictures directly from their SMART phone or computer.
  

Now, I'm very excited to announce that coming soon, ClassDojo will launch their newest feature: Class Story!  As a ClassDojo Mentor, I've been able to play around with this newest feature, and I can promise that it will be even easier for teachers to share classroom updates, funny moments, and announcements with parents.  I loved being able to take a quick picture of a student collaborating with or helping out another student, and send that to their parents along with the student's COLLABORATION Mojo point.  That way, both parents and students had a visual of what it looked like to be successful in my classroom!
At the end of the week, parents are sent a report, indicating how their student behaved.  As a teacher, I could use this data to track various trends, such as when I am taking away points.  Is it right after lunch/recess?  End of the day?  ClassDojo allows me to generate a spreadsheet for analyzing my classroom management.  

Last Thoughts: What about the Secondary Grades & Adult Learners?

I loved using ClassDojo so much, that I helped integrate it throughout our elementary school.  Every grade level, every teacher, every classroom was using ClassDojo to encourage positive behaviors throughout the building.  The one question I always received, however, was what about older learners?  The great thing about ClassDojo is its adaptability for specific teachers and grade levels.  I've had great conversations with secondary teachers who use ClassDojo with their eighth-graders or their juniors/seniors to encourage the behaviors they want to see in their respective classrooms.  High school teachers can create Mojo points for behaviors specific to their content.


In fact, ClassDojo works well for adult learners, too!  For example, I'm currently using ClassDojo with our team of coaches.  It has been a great bonding tool, as well as for our own professional development.  Some of our Mojo include: FINDING A GREAT RESOURCE, TEAMWORK, and BUILDING RELATIONSHIPS.  

If you're a middle or high school teacher, and want to experiment with using ClassDojo, I suggest you subscribe to their YouTube channel.  There are countless videos from secondary teachers discussing how they use ClassDojo in their classrooms.  Don't forget to check out their Teacher Resources page! Need more ideas?  Here is a great set of videos: Ideas for the Classroom.

I used to joke that I always struggled with classroom management, but with ClassDojo, I finally made learning the central focus of my classroom, and not classroom management.


Tuesday, August 11, 2015

Tuesday Tech Tip: New Schoology Awesomeness


Schoology is always improving what they do and how they do it.  The 2015-2016 school year is going to rock with some of the new features Schoology has recently released.  Check out the slides below for additional information and pictures.

Digital Portfolios

Students can actively participate in demonstrating their mastery by creating a portfolio that either displays the process or the product of their learning.  Portfolios can encompass the entire learning cycle or a selection of pieces that showcase their best work. Portfolios provide a space for students to create, celebrate, track progress, share and reflect. You can add text, images, Thinking Maps, embedded content, links, videos and so much more! Portfolios can be private or public. Check out the slides below and Schoology's blog Showcasing your Work in Schoology's Portfolios for additional information. 


Course Linking

Do you teach the same course multiple times? Perhaps you teach Geometry three times.   Now, you are now able to link your similar course sections together so you are really managing just one class! Yep, this is a game changer!  Link courses to manage all materials, due dates and gradebook settings.  Check out the slides below and Schoology's blog Your New Superpower: Manage Multiple Course Sections at Once for additional information.


Discussions

The new discussions look pretty sharp!  This new design will help teachers and students navigate through posts. Check out the slides below and Schoology's blog Six Glorious Reasons to Love Schoology's Redesigned Discussions for additional information.


Mastery Settings

Do you remember when you setup your Mastery Settings and students only had to meet or exceed a standard three times to identify mastery?  Yeah, that's changed.  You decide how many attempts now!  it will make earning that Mastery star more powerful!  Check out the slides below for additional information.

Tuesday, August 4, 2015

Customizing your Dell to Maximize Time and Minimize Frustration


Although our team's focus is with using technology to enhance instruction and not on using/fixing your computer, we sometimes find, when working with teachers, admin and other staff members, frustration when a website doesn't look like it should, like everyone else's. Maybe a link won't work, or pictures are missing. We also sometimes see computers crash, leaving teachers in tears, knowing they have lost important documents, not to mention all of their bookmarks and favorites. If this describes you, or your fear, then read on. Below you’ll find some helpful tips for customizing your Dell to save you time and minimize your frustration level.

You will probably find that Internet Explorer, while the default browser when you get your computer from the district, will not work well when you try to open many websites. Using Internet Explorer, according to our district route techs, leaves you more vulnerable to malware and viruses. That is why we recommend that you use Chrome as your default browser. Although you might only see Explorer on the taskbar of your computer, if you click the Start button , you should find Firefox and Chrome. If you do not, see your building tech for help. Our team recommends using Google Chrome as your default browser for a number of reasons:
  • Your bookmarks follow you to ANY computer, tablet, or smartphone as long as you are signed in to Google Chrome. 
  • You will be using the same browser as your students are when they are on Chromebooks, so that makes it easier to help them with any issues that may pop up with signing in, etc. 
  • We find that Chrome works better than other browsers if you are using Schoology or Google products like Drive, Apps, Classroom, etc. 
To sign in to Google Chrome on your computer:
  1. Open Chrome. 
  2. In the top-right corner of the browser window, click the button with your name or email address. 
  3. Click Sign in to Chrome. 
  4. Sign in with your Google Account (Cherry Creek e-mail address and Active Directory password). 
  5. To customize your sync settings, click Settings. This lets you choose what information to share across other devices where you're signed into Chrome. 
To make Google Chrome your default browser and make future links you click automatically open in Google Chrome:
  1. Click the Chrome menu in the upper-right corner of your browser toolbar. 
  2. Select Settings. 
  3. In the "Default browser" section, click Make Google Chrome the default browser. 
When would I want to use other browsers?

While Chrome works really well with most programs we support in Cherry Creek, there are a few exceptions. Personally, I put Bookmarks/Favorites to the following websites only in the browser that works best for that site so I don’t forget to use the right one:

Where should I save my stuff?

I often see Dell desktops plastered with documents, presentations, and anything else teachers want to save. Not only does that make it difficult to find what you need quickly, your desktop is one of the least secure places to save important documents. The other place to avoid is My Documents on your hard drive. Why? Those locations exist on your computer, and nowhere else.

 If your computer starts acting up and needs to be re-imaged (the hard drive is wiped clean and you go back to what it looked like when you got your computer from the district) or if your hard drive fails (mine did last year) you can lose everything you have saved to the desktop. Avoid the tears by backing up your work into one of the following two secure places: Your Home directory, (H:// drive) or Google Drive.

Your H:// drive is the area on a district server that is dedicated to you and your work. It is labeled H:// for Home. You have to be logged into a computer (not a Chromebook or tablet) while at a district location to access your H:// drive by clicking on the folder with your name that is on your desktop, then looking under Computer on the left side, and finding your CCSD username. When you mouse over it, you will see (H:) at the end of the name. When you open that, you will be able to see everything saved in that area. 

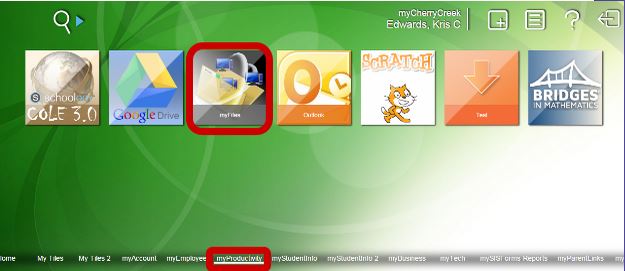
 This drive is backed up regularly at the district level, so you can be sure that what you put in there will be easily accessible as long as you are an employee with CCSD. You can also access your H:// drive from home by going to http://my.cherrycreekschools.org and logging in. Then find the My Productivity tab, then the My Files tab. To view your files this way, you have to download them to your computer and then open them. If you make changes, you will have to save them back to the H://Drive again- the changes will not automatically be made in your H:// drive.


Another place to save your work, my favorite option, is directly into Google Drive. You can upload files, images, and videos to Google Drive on the web so you can work on them anywhere and anytime, from any device- even your smartphone! And, as long as you are signed into your Cherry Creek account, there is no limit to the number of files you can store in Google Drive. The only limitation is in the amount you upload at one time. Files have to be smaller than 5 TB. (I’m guessing that will not be a problem for you, as that’s far more space than you have on the hard drive of your Dell.) There are two ways to upload files to Google Drive.

If you are using the latest versions of Chrome or Firefox, you can drag a folder from your desktop into Google Drive. You can also drag files directly into folders or subfolders.

To upload files using Google Drive:
  1. Go to drive.google.com
  2. Make sure you are logged into your Cherry Creek account. 
  3. On the left, click New. 
  4. Select File upload or Folder upload. 
  5. Select the file or folder you want to upload. To select multiple files, press Ctrl (PC) or Command (Mac) and click all the files to upload. 
  6. You’ll see a box that shows the progress of your file upload. To open the file, click the filename. To close the box, click the X. 
You can also convert your uploaded files to Google Drive format (like Word files to Google Docs, PowerPoints to Google Slides, etc.). Before you upload those files, go to the settings wheel in the upper-right corner of your Chrome browser, and click to add a checkmark in the box next to Convert uploads.


Hopefully these tips will help eliminate anxiety this school year. If you have any questions about these tips, please ask someone from our team, your building tech, or call the help desk at 720-554-HELP.